
应用程序示例
https://hyperledger-fabric.readthedocs.io/en/latest/write_first_app.html
(英文2.2和2.3版本有这个章节,只不过2.2叫做编写你的第一个应用,2.3叫做应用程序示例,中文版的只有2.2,而且举的例子和英文版本不一样,是fabcar,英文版本的是fabric-samples/asset-transfer-basic/application-javascript)
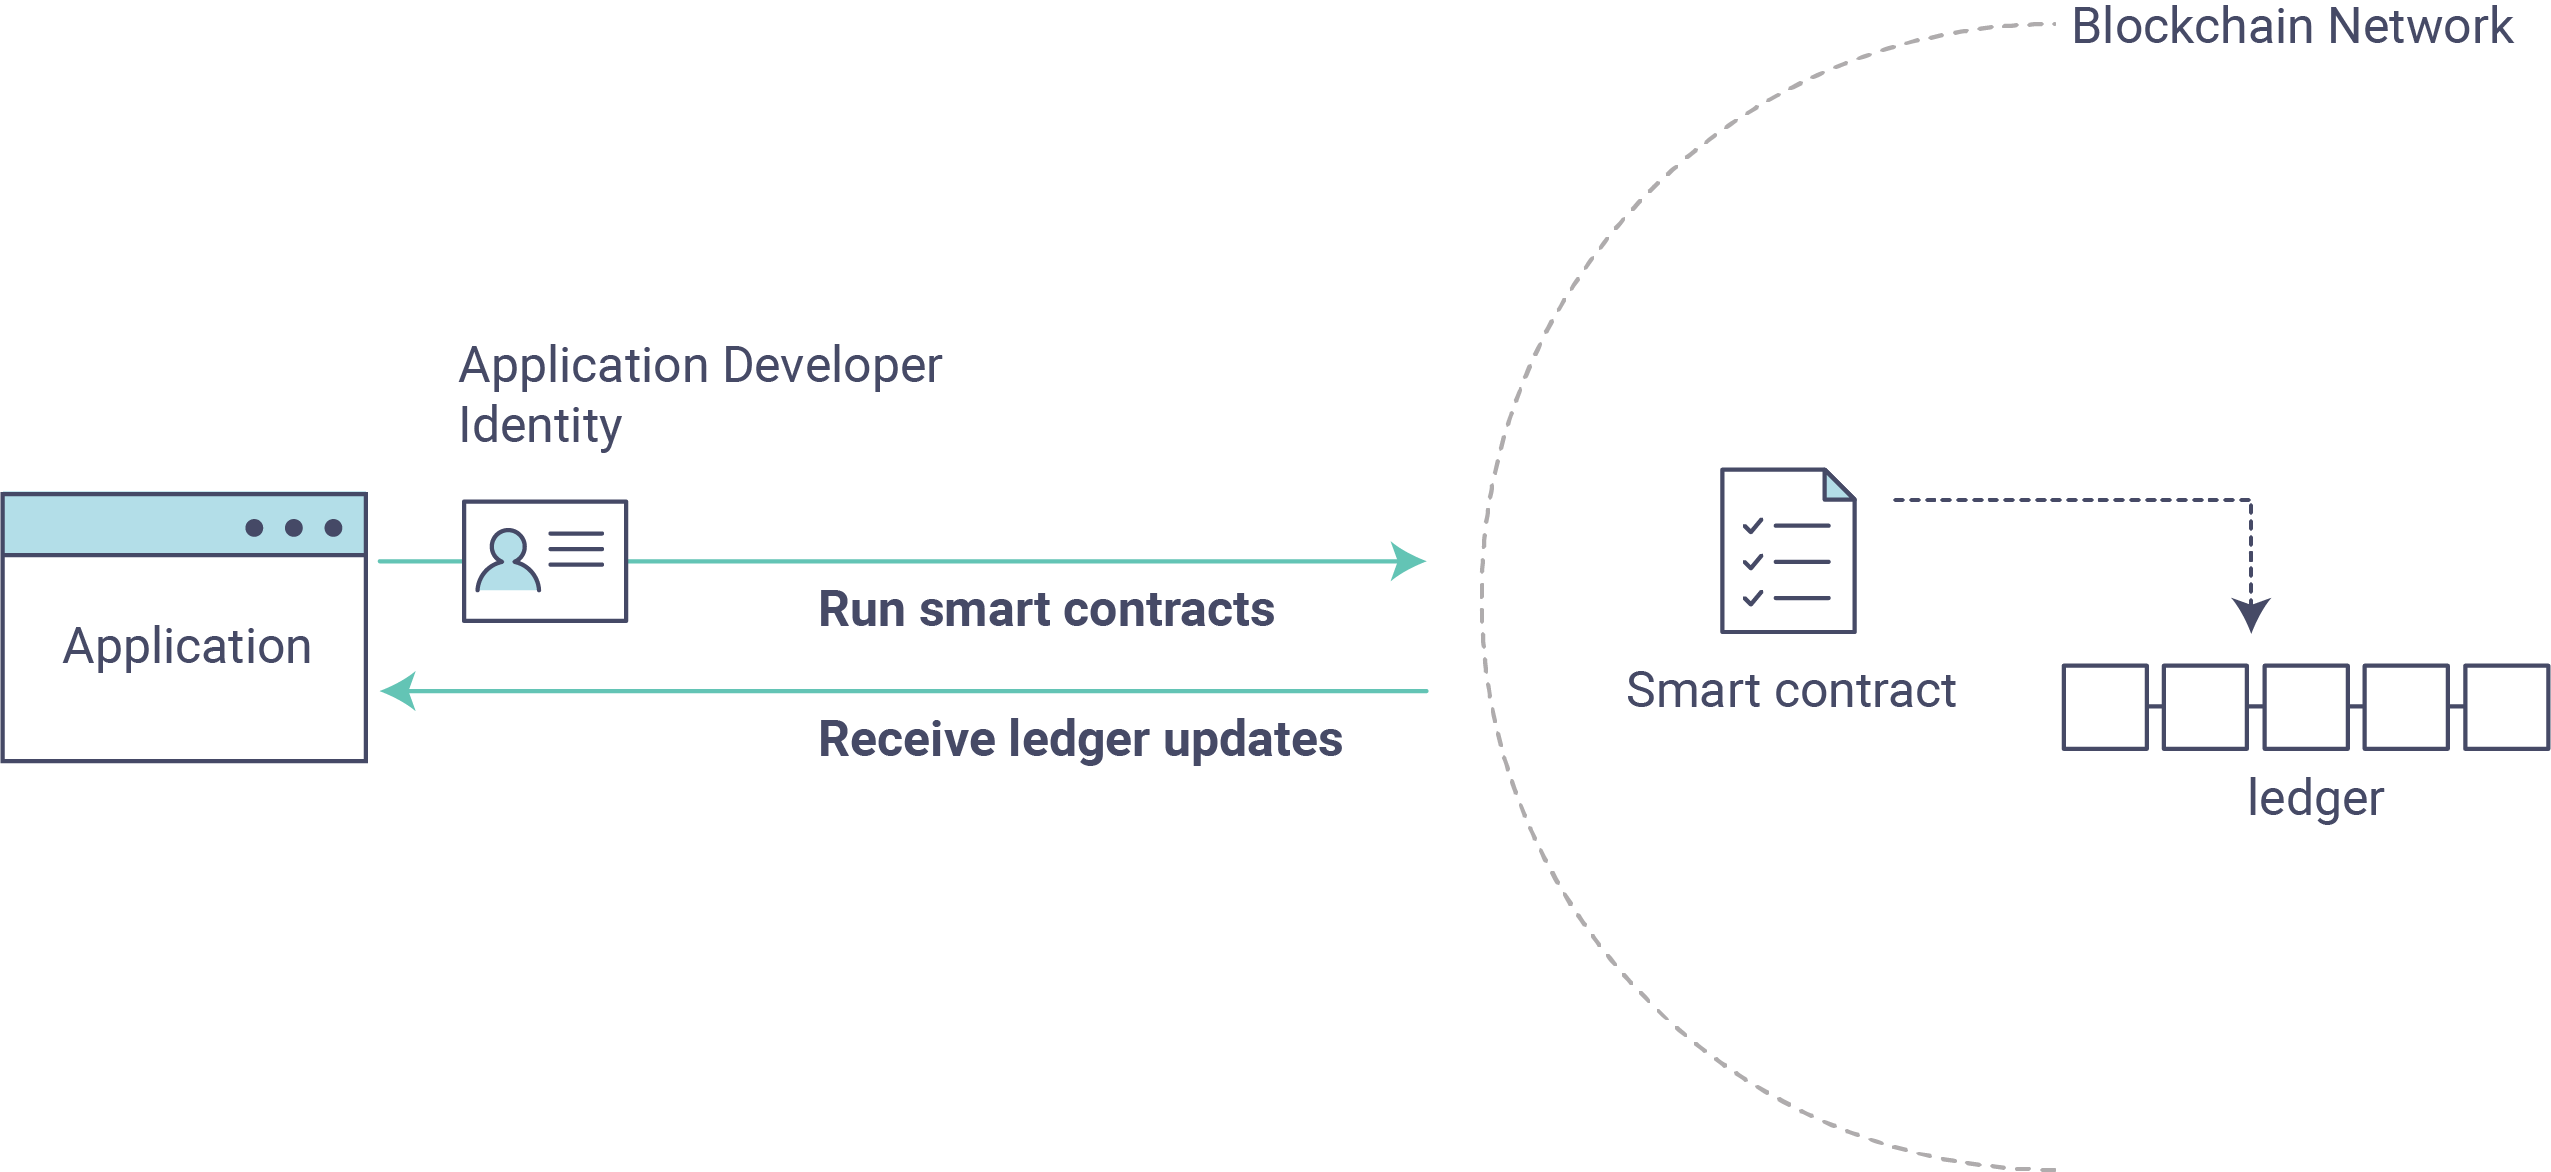
本教程介绍了Fabric应用程序如何与已部署的区块链网络进行交互。本教程使用通过Fabric SDK构建的示例程序(在应用程序主题中进行了详细说明)来调用智能合约,该智能合约使用智能合约API查询和更新账本(在智能合约处理中进行了详细说明)。我们还将使用示例程序和已部署的证书颁发机构来生成应用程序需要与许可的区块链进行交互的X.509证书。
关于资产转移
此资产转移(基本)样本演示了如何使用资产初始化账本,查询那些资产,创建新资产,基于资产ID查询单个资产,更新现有资产以及将资产转移给新所有者。它涉及以下两个组件:
1、示例程序在fabric-samples目录下:调用区块链网络,调用以链码(智能合约)实现的交易。
asset-transfer-basic/application-javascript
2、智能合约本身,实现涉及与账本交互的交易。智能合约(链码)位于以下fabric-samples目录中:
asset-transfer-basic/chaincode-(javascript, java, go, typescript)
我们将经历三个主要步骤:
**1.建立开发环境。**我们的应用程序需要与之交互的网络,因此我们将为我们的智能合约和应用程序部署一个基本的网络。
2.探索样本智能合约。 我们将检查示例assetTransfer(javascript)智能合约,以了解其中的交易以及应用程序如何使用它们查询和更新账本。
**3.通过示例应用程序与智能合约进行交互。**我们的应用程序将使用assetTransfer智能合约在账本上创建,查询和更新资产。我们将研究应用程序及其创建的交易的代码,包括使用资产初始化账本,查询资产,查询一系列资产,创建新资产以及将资产转让给新所有者。
linux先安装这个软件
sudo apt install build-essential
建立区块链网络
启动网络
导航到存储库test-network本地克隆中的子目录 fabric-samples。
cd fabric-samples/test-network
如果您已经在运行测试网络,请将其关闭以确保环境干净。
./network.sh down
使用network.shshell脚本启动Fabric测试网络。
./network.sh up createChannel -c mychannel -ca
此命令将部署具有两个对等方,一个订购服务和三个证书颁发机构(Orderer,Org1,Org2)的Fabric测试网络。代替使用cryptogen工具,我们使用证书颁发机构(因此是-ca标记)来启动测试网络。此外,启动证书颁发机构时会引导组织管理员用户注册。在后续步骤中,我们将显示示例应用程序如何完成管理员注册。
接下来,让我们通过./network.sh使用链码名称和语言选项调用脚本来部署链码。
./network.sh deployCC -ccn basic -ccp ../asset-transfer-basic/chaincode-javascript/ -ccl javascript
笔记
在后台,此脚本使用链码生命周期来打包,安装,查询已安装的链码,批准Org1和Org2的链码,最后提交链码。
如果成功部署了链码,则终端中输出的末尾应类似于以下内容:
Committed chaincode definition for chaincode 'basic' on channel 'mychannel':
Version: 1.0, Sequence: 1, Endorsement Plugin: escc, Validation Plugin: vscc, Approvals: [Org1MSP: true, Org2MSP: true]
===================== Query chaincode definition successful on peer0.org2 on channel 'mychannel' =====================

===================== Chaincode initialization is not required =====================
示例程序
接下来,让我们准备示例资产转移Javascript应用程序,该应用程序将用于与已部署的链码进行交互。
请注意,以下链接中的Go和Java也提供了示例应用程序:
打开一个新的终端,然后导航到该application-javascript文件夹。
cd asset-transfer-basic/application-javascript
该目录包含使用Fabric SDK for Node.js开发的示例程序。运行以下命令以安装应用程序依赖项。最多可能需要一分钟才能完成:
npm install
此过程将安装在的应用程序中定义的关键应用程序依赖项 package.json。其中最重要的是fabric-networkNode.js模块;它使应用程序能够使用身份,钱包和网关来连接到渠道,提交交易并等待通知。本教程还使用该fabric-ca-client模块为用户注册各自的证书颁发机构,生成有效的身份,然后fabric-network模块将其用于与区块链网络进行交互。
一旦完成,一切就绪运行应用程序。让我们看一下将在本教程中使用的示例JavaScript应用程序文件。运行以下命令以列出此目录中的文件:npm install
ls
您应该看到以下内容:
app.js node_modules package.json package-lock.json
笔记
下一节的第一部分涉及与证书颁发机构的通信。您可能会发现,通过打开新的终端外壳并运行,在运行即将到来的程序时,流式传输CA日志很有用 。
docker logs -f ca_org1
第一步,当我们启动Fabric测试网络时,创建了一个管理员用户(字面上称为admin)作为证书颁发机构(CA)的注册商。我们的第一步是admin通过让应用程序调用enrollAdmin来生成私钥,公钥和X.509证书 。此过程使用证书签名请求(CSR)-私钥和公钥首先在本地生成,然后将公用密钥发送到CA,CA返回编码的证书供应用程序使用。这些凭证然后存储在钱包中,使我们能够充当CA的管理员。
让我们运行该应用程序,然后逐步完成与智能合约功能的每个交互。在 asset-transfer-basic/application-javascript目录中,运行以下命令:
node app.js
第一、应用程序注册管理员用户
笔记
重要的是要注意,注册管理员和注册应用程序用户是在应用程序和证书颁发机构之间发生的交互,而不是在应用程序和链码之间发生的交互。如果您检查链码,
asset-transfer-basic/chaincode-javascript/lib您会发现该链码不包含任何支持注册管理员或注册用户的功能。
在下面的示例应用程序代码中,您将看到在参考公共连接配置文件路径之后,确保连接配置文件存在,并指定创建钱包的位置, enrollAdmin()并且从证书颁发机构生成了管理员凭证。
async function main() {
  try {
    // build an in memory object with the network configuration (also known as a connection profile)
    const ccp = buildCCP();

    // build an instance of the fabric ca services client based on
    // the information in the network configuration
    const caClient = buildCAClient(FabricCAServices, ccp);

    // setup the wallet to hold the credentials of the application user
    const wallet = await buildWallet(Wallets, walletPath);

    // in a real application this would be done on an administrative flow, and only once
    await enrollAdmin(caClient, wallet);
此命令将CA管理员的凭据存储在wallet目录中。您可以在wallet/admin.id 文件中找到管理员的证书和私钥。
笔记
如果您决定通过断开网络并重新启动来重新开始,则必须
wallet在重新运行javascript应用程序之前删除该文件夹及其标识,否则会出现错误。发生这种情况的原因是,在关闭测试网络时,关闭了证书颁发机构及其数据库,但是原始钱包仍保留在application-javascript目录中,因此必须将其删除。当您重新运行示例javascript应用程序时,将生成一个新的钱包和凭据。
如果您向上滚动到终端中输出的开头,则应类似于以下内容:
Wallet path: /Users/<your_username>/fabric-samples/asset-transfer-basic/application-javascript/wallet
Successfully enrolled admin user and imported it into the wallet
因为启动证书颁发机构时会引导管理员注册步骤,所以我们只需要注册管理员。
笔记
由于Fabric CA交互在示例中是通用的,因此enrollAdmin()和其他与CA相关的功能都包含在
fabric-samples/test-application/javascript/CAUtil.js通用实用程序中。
对于应用程序用户,我们需要应用程序在下一步中注册和注册用户。
第二、应用程序注册并注册一个应用程序用户
现在我们已经在钱包中拥有管理员的凭据,该应用程序将使用该admin 用户来注册和注册一个应用程序用户,该用户将用于与区块链网络进行交互。应用程序代码部分如下所示。
// in a real application this would be done only when a new user was required to be added
// and would be part of an administrative flow
await registerUser(caClient, wallet, userId, 'org1.department1');
(我看代码不是这样子的,是这样子的)
// in a real application this would be done only when a new user was required to be added
// and would be part of an administrative flow
await registerAndEnrollUser(caClient, wallet, mspOrg1, org1UserId, 'org1.department1');
与管理员注册类似,此功能使用CSR来注册,注册appUser和存储其凭据以及admin钱包中的凭据。现在,我们拥有两个独立用户的身份,admin并且appUser该身份可以由我们的应用程序使用。
在终端输出中进一步向下滚动,您应该看到类似于以下内容的应用程序用户注册确认:
Successfully registered and enrolled user appUser and imported it into the wallet
第三、示例应用程序准备与渠道和智能合约的连接
在前面的步骤中,应用程序生成了管理员和应用程序用户凭据,并将其放置在钱包中。如果凭据存在并且具有与之关联的正确权限属性,则示例应用程序用户将能够在引用通道名称和合同名称之后调用链码功能。
笔记
我们的连接配置仅指定您自己的组织中的对等方。我们告诉节点客户端sdk使用服务发现(在同级上运行),该服务获取当前处于联机状态的其他同级,元数据(如相关的认可策略)以及否则需要与其余节点进行通信的任何静态信息。由于我们的客户端与其他结构节点在同一网络上运行,因此
asLocalhostsettrue告知它以localhost连接。在不将客户端与其他结构节点在同一网络上运行的部署中,该asLocalhost选项将设置为false。
您会注意到,在以下应用程序代码行中,应用程序正在通过网关使用合同名称和渠道名称来引用合同:
// Create a new gateway instance for interacting with the fabric network.
// In a real application this would be done as the backend server session is setup for
// a user that has been verified.
const gateway = new Gateway();

try {
  // setup the gateway instance
  // The user will now be able to create connections to the fabric network and be able to
  // submit transactions and query. All transactions submitted by this gateway will be
  // signed by this user using the credentials stored in the wallet.
  await gateway.connect(ccp, {
    wallet,
    identity: userId,
    discovery: {enabled: true, asLocalhost: true} // using asLocalhost as this gateway is using a fabric network deployed locally
  });

  // Build a network instance based on the channel where the smart contract is deployed
  const network = await gateway.getNetwork(channelName);


  // Get the contract from the network.
  const contract = network.getContract(chaincodeName);
当链码包包含多个智能合约时,可以在getContract()API上指定链码包的名称和要定位的特定智能合约。例如:
const contract = await network.getContract('chaincodeName', 'smartContractName');
第四、应用程序使用一些样本数据初始化账本
现在我们已经到了实际让示例应用程序提交事务的地步,让我们按顺序进行处理。为每个被调用的函数以及终端输出提供了应用程序代码片段和调用的链代码片段。
SubmitTransaction()函数用于调用chaincodeInitLedger函数,以使用一些样本数据填充账本。在幕后,submitTransaction()函数将使用服务发现来为链码找到一组所需的认可对等体,在所需数目的对等体上调用链码,从这些对等体收集链码认可的结果,最后将事务提交给订购服务。
示例程序'InitLedger'电话
// Initialize a set of asset data on the channel using the chaincode 'InitLedger' function.
// This type of transaction would only be run once by an application the first time it was started after it
// deployed the first time. Any updates to the chaincode deployed later would likely not need to run
// an "init" type function.
console.log('\n--> Submit Transaction: InitLedger, function creates the initial set of assets on the ledger');
await contract.submitTransaction('InitLedger');
console.log('*** Result: committed');
在lib/assetTransfer.js中,链码'InitLedger'功能
async InitLedger(ctx) {
     const assets = [
         {
             ID: 'asset1',
             Color: 'blue',
             Size: 5,
             Owner: 'Tomoko',
             AppraisedValue: 300,
         },
         {
             ID: 'asset2',
             Color: 'red',
             Size: 5,
             Owner: 'Brad',
             AppraisedValue: 400,
         },
         {
             ID: 'asset3',
             Color: 'green',
             Size: 10,
             Owner: 'Jin Soo',
             AppraisedValue: 500,
         },
         {
             ID: 'asset4',
             Color: 'yellow',
             Size: 10,
             Owner: 'Max',
             AppraisedValue: 600,
         },
         {
             ID: 'asset5',
             Color: 'black',
             Size: 15,
             Owner: 'Adriana',
             AppraisedValue: 700,
         },
         {
             ID: 'asset6',
             Color: 'white',
             Size: 15,
             Owner: 'Michel',
             AppraisedValue: 800,
         },
     ];

     for (const asset of assets) {
         asset.docType = 'asset';
         await ctx.stub.putState(asset.ID, Buffer.from(JSON.stringify(asset)));
         console.info(`Asset ${asset.ID} initialized`);
     }
 }
终端输出条目应类似于以下内容:
Submit Transaction: InitLedger, function creates the initial set of assets on the ledger
第五、应用程序调用每个chaincode函数
首先,关于查询账本的一句话。
区块链网络中的每个对等方都拥有一个账本的副本。应用程序可以使用对等点上运行的智能合约的只读调用(称为查询)来查看账本中的最新数据。
这是查询工作方式的简化表示:

最常见的查询涉及账本中数据的当前值-其 世界状态。世界状态表示为一组键/值对,应用程序可以查询单个键或多个键的数据。此外,当您使用CouchDB作为状态数据库并使用JSON建模数据时,可以使用复杂的查询来读取账本上的数据。当寻找与某些关键字具有特定值匹配的所有资产时,这将非常有用。例如,具有特定所有者的所有资产。
下面,该示例应用程序仅获取我们在使用数据初始化账本时在上一步中填充的所有资产。当您要查询单个对等方而无需向定单服务提交交易时,可以使用validateTransaction()函数。
获得所有资产
示例程序'GetAllAssets'
// Let's try a query type operation (function).
// This will be sent to just one peer and the results will be shown.
console.log('\n--> Evaluate Transaction: GetAllAssets, function returns all the current assets on the ledger');
let result = await contract.evaluateTransaction('GetAllAssets');
console.log(`*** Result: ${prettyJSONString(result.toString())}`);
链码'GetAllAssets'功能
// GetAllAssets returns all assets found in the world state.
 async GetAllAssets(ctx) {
     const allResults = [];
     // range query with empty string for startKey and endKey does an open-ended query of all assets in the chaincode namespace.
     const iterator = await ctx.stub.getStateByRange('', '');
     let result = await iterator.next();
     while (!result.done) {
         const strValue = Buffer.from(result.value.value.toString()).toString('utf8');
         let record;
         try {
             record = JSON.parse(strValue);
         } catch (err) {
             console.log(err);
             record = strValue;
         }
         allResults.push({ Key: result.value.key, Record: record });
         result = await iterator.next();
     }
     return JSON.stringify(allResults);
 }
终端输出应如下所示:
  Evaluate Transaction: GetAllAssets, function returns all the current assets on the ledger
  Result: [
  {
    "Key": "asset1",
    "Record": {
      "ID": "asset1",
      "Color": "blue",
      "Size": 5,
      "Owner": "Tomoko",
      "AppraisedValue": 300,
      "docType": "asset"
    }
  },
  {
    "Key": "asset2",
    "Record": {
      "ID": "asset2",
      "Color": "red",
      "Size": 5,
      "Owner": "Brad",
      "AppraisedValue": 400,
      "docType": "asset"
    }
  },
  {
    "Key": "asset3",
    "Record": {
      "ID": "asset3",
      "Color": "green",
      "Size": 10,
      "Owner": "Jin Soo",
      "AppraisedValue": 500,
      "docType": "asset"
    }
  },
  {
    "Key": "asset4",
    "Record": {
      "ID": "asset4",
      "Color": "yellow",
      "Size": 10,
      "Owner": "Max",
      "AppraisedValue": 600,
      "docType": "asset"
    }
  },
  {
    "Key": "asset5",
    "Record": {
      "ID": "asset5",
      "Color": "black",
      "Size": 15,
      "Owner": "Adriana",
      "AppraisedValue": 700,
      "docType": "asset"
    }
  },
  {
    "Key": "asset6",
    "Record": {
      "ID": "asset6",
      "Color": "white",
      "Size": 15,
      "Owner": "Michel",
      "AppraisedValue": 800,
      "docType": "asset"
    }
  }
]
接下来,示例应用程序提交事务以创建“ asset13”。
创建新资产
示例程序'CreateAsset'
// Now let's try to submit a transaction.
// This will be sent to both peers and if both peers endorse the transaction, the endorsed proposal will be sent
// to the orderer to be committed by each of the peer's to the channel ledger.
console.log('\n--> Submit Transaction: CreateAsset, creates new asset with ID, color, owner, size, and appraisedValue arguments');
await contract.submitTransaction('CreateAsset', 'asset13', 'yellow', '5', 'Tom', '1300');
console.log('*** Result: committed');
链码'CreateAsset'功能
// CreateAsset issues a new asset to the world state with given details.
async CreateAsset(ctx, id, color, size, owner, appraisedValue) {
  const asset = {
      ID: id,
      Color: color,
      Size: size,
      Owner: owner,
      AppraisedValue: appraisedValue,
  };
  return ctx.stub.putState(id, Buffer.from(JSON.stringify(asset)));
}
终端输出:
Submit Transaction: CreateAsset, creates new asset with ID, color, owner, size, and appraisedValue arguments
笔记
在上面的应用程序和链码片段中,必须注意的是,示例应用程序
'CreateAsset'使用链码期望的相同类型和数量的参数,并以正确的顺序提交了事务。在这种情况下,事务名称和正确测序参数是:'CreateAsset','asset13','yellow','5','Tom','1300'因为相应的chaincode CreateAsset期待的定义资产对象参数的正确顺序和类型:序列:ID,颜色,大小,所有者和AppraisedValue类型:ID(字符串),颜色(字符串),大小(整数),所有者(字符串),AppraisedValue(整数)。
然后,示例应用程序评估对“ asset13”的查询。
读取资产
示例程序'ReadAsset'
console.log('\n--> Evaluate Transaction: ReadAsset, function returns an asset with a given assetID');
result = await contract.evaluateTransaction('ReadAsset', 'asset13');
console.log(`*** Result: ${prettyJSONString(result.toString())}`);
链码'ReadAsset'功能
// ReadAsset returns the asset stored in the world state with given id.
async ReadAsset(ctx, id) {
  const assetJSON = await ctx.stub.getState(id); // get the asset from chaincode state
  if (!assetJSON || assetJSON.length === 0) {
      throw new Error(`The asset ${id} does not exist`);
  }
  return assetJSON.toString();
}
终端输出:
Evaluate Transaction: ReadAsset, function returns an asset with a given assetID
Result: {
  "ID": "asset13",
  "Color": "yellow",
  "Size": "5",
  "Owner": "Tom",
  "AppraisedValue": "1300"
}
在序列的下一部分中,示例应用程序将评估看是否 asset1存在,这将返回布尔值true,因为asset1在用资产初始化账本时,我们用账本填充了账本。你可能还记得,原来的评估价值asset1为300。然后,应用程序提交交易以asset1使用新的评估值进行更新,然后立即进行评估以asset1从账本中读取以显示的新评估值350。
判断是否存在
示例应用程序'AssetExists','UpdateAsset'以及'ReadAsset'
console.log('\n--> Evaluate Transaction: AssetExists, function returns "true" if an asset with given assetID exist');
result = await contract.evaluateTransaction('AssetExists', 'asset1');
console.log(`*** Result: ${prettyJSONString(result.toString())}`);

console.log('\n--> Submit Transaction: UpdateAsset asset1, change the appraisedValue to 350');
await contract.submitTransaction('UpdateAsset', 'asset1', 'blue', '5', 'Tomoko', '350');
console.log('*** Result: committed');

console.log('\n--> Evaluate Transaction: ReadAsset, function returns "asset1" attributes');
result = await contract.evaluateTransaction('ReadAsset', 'asset1');
console.log(`*** Result: ${prettyJSONString(result.toString())}`);
链码'AssetExists','UpdateAsset'和'ReadAsset'`功能
// AssetExists returns true when asset with given ID exists in world state.
   async AssetExists(ctx, id) {
       const assetJSON = await ctx.stub.getState(id);
       return assetJSON && assetJSON.length > 0;
   }
// UpdateAsset updates an existing asset in the world state with provided parameters.
   async UpdateAsset(ctx, id, color, size, owner, appraisedValue) {
       const exists = await this.AssetExists(ctx, id);
       if (!exists) {
           throw new Error(`The asset ${id} does not exist`);
       }

       // overwriting original asset with new asset
       const updatedAsset = {
           ID: id,
           Color: color,
           Size: size,
           Owner: owner,
           AppraisedValue: appraisedValue,
       };
       return ctx.stub.putState(id, Buffer.from(JSON.stringify(updatedAsset)));
   }
 // ReadAsset returns the asset stored in the world state with given id.
 async ReadAsset(ctx, id) {
     const assetJSON = await ctx.stub.getState(id); // get the asset from chaincode state
     if (!assetJSON || assetJSON.length === 0) {
         throw new Error(`The asset ${id} does not exist`);
     }
     return assetJSON.toString();
 }
终端输出:
Evaluate Transaction: AssetExists, function returns "true" if an asset with given assetID exist
Result: true

Submit Transaction: UpdateAsset asset1, change the appraisedValue to 350

Evaluate Transaction: ReadAsset, function returns "asset1" attributes
Result: {
  "ID": "asset1",
  "Color": "blue",
  "Size": "5",
  "Owner": "Tomoko",
  "AppraisedValue": "350"
}
在序列的这一部分中,示例应用程序尝试'UpdateAsset'针对我们不知道的资产(asset70)提交事务。我们希望得到一个错误,因为您无法更新不存在的资产,这就是为什么在尝试更新或删除资产之前检查资产是否存在的一个好主意。
示例程序'UpdateAsset'
try {
  // How about we try a transactions where the executing chaincode throws an error
  // Notice how the submitTransaction will throw an error containing the error thrown by the chaincode
  console.log('\n--> Submit Transaction: UpdateAsset asset70, asset70 does not exist and should return an error');
  await contract.submitTransaction('UpdateAsset', 'asset70', 'blue', '5', 'Tomoko', '300');
  console.log('******** FAILED to return an error');
} catch (error) {
  console.log(`*** Successfully caught the error: \n    ${error}`);
}
链码'UpdateAsset'功能
// UpdateAsset updates an existing asset in the world state with provided parameters.
async UpdateAsset(ctx, id, color, size, owner, appraisedValue) {
    const exists = await this.AssetExists(ctx, id);
    if (!exists) {
        throw new Error(`The asset ${id} does not exist`);
    }

      // overwriting original asset with new asset
      const updatedAsset = {
          ID: id,
          Color: color,
          Size: size,
          Owner: owner,
          AppraisedValue: appraisedValue,
      };
      return ctx.stub.putState(id, Buffer.from(JSON.stringify(updatedAsset)));
  }
终端输出:
Submit Transaction: UpdateAsset asset70
2020-08-02T11:12:12.322Z - error: [Transaction]: Error: No valid responses from any peers. Errors:
  peer=peer0.org1.example.com:7051, status=500, message=error in simulation: transaction returned with failure: Error: The asset asset70 does not exist
  peer=peer0.org2.example.com:9051, status=500, message=error in simulation: transaction returned with failure: Error: The asset asset70 does not exist
Expected an error on UpdateAsset of non-existing Asset: Error: No valid responses from any peers. Errors:
  peer=peer0.org1.example.com:7051, status=500, message=error in simulation: transaction returned with failure: Error: The asset asset70 does not exist
  peer=peer0.org2.example.com:9051, status=500, message=error in simulation: transaction returned with failure: Error: The asset asset70 does not exist
转移资产
在示例应用程序交易序列的最后一部分中,应用程序提交交易以将现有资产转移到新所有者,然后从账本中读回资产以显示新所有者Tom。
样例应用程序'TransferAsset'和'ReadAsset'调用
console.log('\n--> Submit Transaction: TransferAsset asset1, transfer to new owner of Tom');
await contract.submitTransaction('TransferAsset', 'asset1', 'Tom');
console.log('*** Result: committed');

console.log('\n--> Evaluate Transaction: ReadAsset, function returns "asset1" attributes');
result = await contract.evaluateTransaction('ReadAsset', 'asset1');
console.log(`*** Result: ${prettyJSONString(result.toString())}`);
链码'TransferAsset'和'ReadAsset'功能
// TransferAsset updates the owner field of asset with given id in the world state.
async TransferAsset(ctx, id, newOwner) {
    const assetString = await this.ReadAsset(ctx, id);
    const asset = JSON.parse(assetString);
    asset.Owner = newOwner;
    return ctx.stub.putState(id, Buffer.from(JSON.stringify(asset)));
}
 // ReadAsset returns the asset stored in the world state with given id.
async ReadAsset(ctx, id) {
    const assetJSON = await ctx.stub.getState(id); // get the asset from chaincode state
    if (!assetJSON || assetJSON.length === 0) {
        throw new Error(`The asset ${id} does not exist`);
    }
    return assetJSON.toString();
}
终端输出:
Submit Transaction: TransferAsset asset1, transfer to new owner of Tom
Evaluate Transaction: ReadAsset, function returns "asset1" attributes
Result: {
  "ID": "asset1",
  "Color": "blue",
  "Size": "5",
  "Owner": "Tom",
  "AppraisedValue": "350"
}
仔细看看
让我们仔细研究一下示例javascript应用程序如何使用Fabric Node SDK提供的API 与我们的Fabric网络进行交互。使用编辑器(例如原子或Visual Studio)来打开app.js位于该asset-transfer-basic/application-javascript目录。
该应用程序首先从fabric-network模块中引入作用域两个关键类 。Wallets和Gateway。这些类将用于appUser在钱包中定位身份,并使用其连接到网络:
const { Gateway, Wallets } = require('fabric-network');
首先,该程序使用存储在钱包中的userId设置网关连接,并指定发现选项。
// setup the gateway instance
// The user will now be able to create connections to the fabric network and be able to
// submit transactions and query. All transactions submitted by this gateway will be
// signed by this user using the credentials stored in the wallet.
await gateway.connect(ccp, {
  wallet,
  identity: userId,
  discovery: {enabled: true, asLocalhost: true} // using asLocalhost as this gateway is using a fabric network deployed locally
});
请注意,在示例应用程序代码的顶部,我们需要外部实用程序文件来构建CAClient,registerUser,enrollAdmin,buildCCP(公共连接配置文件)和buildWallet。这些实用程序位于AppUtil.js,在test-application/javascript目录中。
在AppUtil.js中,ccpPath描述了我们的应用程序将用于连接到我们的网络的连接配置文件的路径。连接配置文件是从fabric-samples/test-network目录内部加载的, 并解析为JSON文件:
const ccpPath = path.resolve(__dirname, '..', '..', 'test-network','organizations','peerOrganizations','org1.example.com', 'connection-org1.json');
如果您想了解有关连接配置文件的结构以及它如何定义网络的更多信息,请查看 连接配置文件主题。
一个网络可以分为多个通道,下一条重要的代码行将应用程序连接到网络mychannel中部署了我们的智能合约的特定通道 。请注意,我们在示例应用程序顶部附近分配了常量,以说明渠道名称和合同名称:
const channelName = 'mychannel';
const chaincodeName = 'basic';
const network = await gateway.getNetwork(channelName);
在此渠道中,我们可以访问资产转移(“基本”)智能合约以与账本进行交互:
const contract = network.getContract(chaincodeName);
在资产转移(“基本”)中,有许多不同的事务,我们的应用程序最初使用该InitLedger事务向总账世界状态填充数据:
await contract.submitTransaction('InitLedger');
该evaluateTransaction方法代表了与区块链网络中智能合约最简单的交互之一。它只是选择一个在连接配置文件中定义的对等体,然后将请求发送到该对等体,并在此对其进行评估。智能合约在对等方的账本副本上查询资产,并将结果返回给应用程序。这种交互不会导致账本的更新。
submitTransaction比evaluateTransaction。复杂得多。SDK不会与单个对等方进行交互,而是会发送 submitTransaction根据chaincode的背书策略向区块链网络中每个需要的组织对等方提出建议。这些对等方中的每一个都将使用该提议执行所请求的智能合约,以生成交易响应,该交易响应将其认可(签署)并返回到SDK。SDK将所有已认可的交易响应收集到一个交易中,然后将其提交给订购者。订购者将来自各种应用程序客户端的交易收集并排序为一个交易块。这些块被分发到网络中的每个对等点,在此对每个事务进行验证和提交。最后,通过事件通知SDK,使其可以将控制权返回给应用程序。
笔记
submitTransaction包括一个事件侦听器,该侦听器进行检查以确保交易已通过验证并已提交到账本。应用程序应该利用提交侦听器,或者利用类似的APIsubmitTransaction来为您完成此任务。否则,您的交易可能无法成功订购,验证并提交到账本。
submitTransaction为应用程序完成所有这些工作!应用程序,智能合约,对等方和订购服务一起工作以保持总帐在整个网络中一致的过程称为共识,本节对此进行了详细说明。
更新账本
从应用程序的角度来看,更新账本很简单。应用程序将交易提交到区块链网络,并且在验证和提交交易后,该应用程序会收到有关交易成功的通知。在幕后,这涉及共识过程,通过该过程,区块链网络的不同组件将共同努力,以确保对账本的每个建议更新均有效并以一致且一致的顺序执行。

清理
完成资产转移样本的使用后,您可以使用network.sh脚本关闭测试网络。
./network.sh down
此命令将关闭我们创建的网络的CA,对等方和订购节点。请注意,账本上的所有数据都将丢失。如果您想再次阅读本教程,则将从一个干净的初始状态开始。
额外资源
正如我们在简介中所述,我们有一整节关于“ 开发应用程序”的内容,其中包括有关智能合约,流程和数据设计的深入信息,使用更深入的《商业论文》教程的教程以及与之相关的大量其他材料。应用程序的开发。
编写你的第一个应用
(此处的fabcar例子是中文版本2.2才有的例子,英文版本则是2.1用的这个例子,2.2和2.3不是这个例子)
一、设置区块链网络
启动网络并部署链码
该命令将部署具有两个对等体和一个订购服务的 Fabric 测试网络。我们将不使用cryptogen工具,而是使用Certificate Authorities来提起测试网络。我们将使用其中的一个CA来创建我们的应用程序在未来步骤中使用的证书和密钥。startFabric.sh脚本还将在通道mychannel上部署和初始化JavaScript版本的FabCar智能合约,然后调用智能合约将初始数据放在账本上。
cd fabric-samples/fabcar
./startFabric.sh javascript
二、示例应用程序
安装相关依赖
cd javascript
npm install
这个指令将安装应用程序的主要依赖,这些依赖定义在 package.json 中。其中最重要的是 fabric-network 类;它使得应用程序可以使用身份、钱包和连接到通道的网关,以及提交交易和等待通知。本教程也将使用 fabric-ca-client 类来注册用户以及他们的授权证书,生成一个 fabric-network 在后边会用到的合法身份。
会有如下文件
enrollAdmin.js  node_modules       package.json  registerUser.js
invoke.js       package-lock.json  query.js      wallet
三、登记管理员用户
注解
下边的部分执行和证书授权服务器通讯。你在运行下边的程序时,你会发现,打开一个新终端,并运行
docker logs -f ca_org1来查看 CA 的日志流,会很有帮助。
当我们创建网络的时候,一个管理员用户( admin)被证书授权服务器(CA)创建成了 注册员 。我们第一步要使用 enroll.js 程序为 admin 生成私钥、公钥和 x.509 证书。这个程序使用一个 证书签名请求 (CSR)——现在本地生成公钥和私钥,然后把公钥发送到 CA ,CA 会发布会一个让应用程序使用的证书。这三个证书会保存在钱包中,以便于我们以管理员的身份使用 CA 。
我们登记一个 admin 用户:
node enrollAdmin.js
这个命令将 CA 管理员的证书保存在 wallet/admin.id 文件里。
四、注册和登记应用程序用户
我们的管理员是用来与CA合作的。现在我们在钱包中拥有管理员的证书,我们可以创建一个新的应用用户,它将用于与区块链进行交互。运行以下命令来注册和注册一个名为appUser的新用户。
(这个应该叫做registerAndEnrollUser比较合适)
node registerUser.js
与管理员注册类似,该程序使用CSR来注册appUser,并将其凭证与管理员的凭证一起存储在钱包中。现在我们有了两个独立用户的身份--admin和appUser,可以被我们的应用程序使用。
五、查询账本
区块链网络中的每个节点都拥有一个 账本 <./ledger/ledger.html> 的副本,应用程序可以通过执行智能合约查询账本上最新的数据来实现来查询账本,并将查询结果返回给应用程序。
这里是一个查询工作如何进行的简单说明:
最常用的查询是查寻账本中询当前的值,也就是 世界状态 。世界状态是一个键值对的集合,应用程序可以根据一个键或者多个键来查询数据。而且,当键值对是以 JSON 值模式组织的时候,世界状态可以通过配置使用数据库(如 CouchDB )来支持富查询。这对于查询所有资产来匹配特定的键的值是很有用的,比如查询一个人的所有汽车。
首先,我们来运行我们的 query.js 程序来返回账本上所有汽车的侦听。这个程序使用我们的第二个身份——user1——来操作账本。
node query.js
输入结果应该类似下边:
Wallet path: ...fabric-samples/fabcar/javascript/wallet
Transaction has been evaluated, result is:
[{"Key":"CAR0","Record":{"color":"blue","docType":"car","make":"Toyota","model":"Prius","owner":"Tomoko"}},
{"Key":"CAR1","Record":{"color":"red","docType":"car","make":"Ford","model":"Mustang","owner":"Brad"}},
{"Key":"CAR2","Record":{"color":"green","docType":"car","make":"Hyundai","model":"Tucson","owner":"Jin Soo"}},
{"Key":"CAR3","Record":{"color":"yellow","docType":"car","make":"Volkswagen","model":"Passat","owner":"Max"}},
{"Key":"CAR4","Record":{"color":"black","docType":"car","make":"Tesla","model":"S","owner":"Adriana"}},
{"Key":"CAR5","Record":{"color":"purple","docType":"car","make":"Peugeot","model":"205","owner":"Michel"}},
{"Key":"CAR6","Record":{"color":"white","docType":"car","make":"Chery","model":"S22L","owner":"Aarav"}},
{"Key":"CAR7","Record":{"color":"violet","docType":"car","make":"Fiat","model":"Punto","owner":"Pari"}},
{"Key":"CAR8","Record":{"color":"indigo","docType":"car","make":"Tata","model":"Nano","owner":"Valeria"}},
{"Key":"CAR9","Record":{"color":"brown","docType":"car","make":"Holden","model":"Barina","owner":"Shotaro"}}]
Let’s take a closer look at how query.js program uses the APIs provided by the Fabric Node SDK to interact with our Fabric network。使用一个编辑器(比如, atom 或 visual studio)打开 query.js 。
The application starts by bringing in scope two key classes from the fabric-network module; Wallets and Gateway. These classes will be used to locate the appUser identity in the wallet, and use it to connect to the network:
const { Gateway, Wallets } = require('fabric-network');
First, the program uses the Wallet class to get our application user from our file system.
const identity = await wallet.get('appUser');
Once the program has an identity, it uses the Gateway class to connect to our network.
const gateway = new Gateway();
await gateway.connect(ccpPath, { wallet, identity: 'appUser', discovery: { enabled: true, asLocalhost: true } });
ccpPath describes the path to the connection profile that our application will use to connect to our network. The connection profile was loaded from inside the fabric-samples/test-network directory and parsed as a JSON file:
const ccpPath = path.resolve(__dirname, '..', '..', 'test-network','organizations','peerOrganizations','org1.example.com', 'connection-org1.json');
如果你想了解更多关于连接配置文件的结构,和它是怎么定义网络的,请查阅 链接配置主题 。
一个网络可以被差分成很多通道,代码中下一个很重的一行是将应用程序连接到网络中特定的通道 mychannel 上:
const network = await gateway.getNetwork('mychannel');
在这个通道中,我们可以通过 FabCar 智能合约来和账本进行交互:
const contract = network.getContract('fabcar');
在 fabcar 中有许多不同的 交易 ,我们的应用程序先使用 queryAllCars 交易来查询账本世界状态的值:
const result = await contract.evaluateTransaction('queryAllCars');
evaluateTransaction 方法代表了一种区块链网络中和智能合约最简单的交互。它只是的根据配置文件中的定义连接一个节点,然后向节点发送请求,请求内容将在节点中执行。智能合约查询节点账本上的所有汽车,然后把结果返回给应用程序。这次交互没有导致账本的更新。
FabCar 智能合约
FabCar smart contract sample is available in following languages:
Let’s take a look at the transactions within the FabCar smart contract written in JavaScript. Open a new terminal and navigate to the JavaScript version of the FabCar Smart contract inside the fabric-samples repository:
cd fabric-samples/chaincode/fabcar/javascript/lib
Open the fabcar.js file in a text editor editor.
See how our smart contract is defined using the Contract class:
class FabCar extends Contract {...
在这个类结构中,你将看到定义了以下交易: initLedger, queryCar, queryAllCars, createCar 和 changeCarOwner 。例如:
async queryCar(ctx, carNumber) {...}
async queryAllCars(ctx) {...}
让我们更进一步看一下 queryAllCars ,看一下它是怎么和账本交互的。
async queryAllCars(ctx) {

  const startKey = '';
  const endKey = '';

  const iterator = await ctx.stub.getStateByRange(startKey, endKey);
This code shows how to retrieve all cars from the ledger within a key range using getStateByRange. Giving empty startKey & endKey is interpreted as all the keys from beginning to end. As another example, if you use startKey = 'CAR0', endKey = 'CAR999' , then getStateByRange will retrieve cars with keys between CAR0 (inclusive) and CAR999 (exclusive) in lexical order. The remainder of the code iterates through the query results and packages them into JSON for the sample application to use.
下面展示了应用程序如何调用智能合约中的不同交易。每一个交易都使用一组 API 比如 getStateByRange 来和账本进行交互。了解更多 API 请阅读 detail.

你可以看到我们的 queryAllCars 交易,还有另一个叫做 createCar 。我们稍后将在教程中使用他们来更细账本,和添加新的区块。
但是在那之前,返回到 query 程序,更改 evaluateTransaction 的请求来查询 CAR4 。 query 程序现在看起来应该是这个样子:
const result = await contract.evaluateTransaction('queryCar', 'CAR4');
保存程序,然后返回到 fabcar/javascript 目录。现在,再次运行 query 程序:
node query.js
你应该会看到如下:
Wallet path: ...fabric-samples/fabcar/javascript/wallet
Transaction has been evaluated, result is:
{"color":"black","docType":"car","make":"Tesla","model":"S","owner":"Adriana"}
如果你回头去看一下 queryAllCars 的交易结果,你会看到 CAR4 是 Adriana 的黑色 Tesla model S,也就是这里返回的结果。
我们可以使用 queryCar 交易来查询任意汽车,使用它的键 (比如 CAR0 )得到车辆的制造商、型号、颜色和车主等相关信息。
很棒。现在你应该已经了解了智能合约中基础的查询交易,也手动修改了查询程序中的参数。
账本更新时间。。。
更新账本
现在我们已经完成一些账本的查询和添加了一些代码,我们已经准备好更新账本了。有很多的更新操作我们可以做,但是我们从创建一个 新 车开始。
从一个应用程序的角度来说,更新一个账本很简单。应用程序向区块链网络提交一个交易,当交易被验证和提交后,应用程序会收到一个交易成功的提醒。但是在底层,区块链网络中各组件中不同的 共识 程序协同工作,来保证账本的每一个更新提案都是合法的,而且有一个大家一致认可的顺序。

上图中,我们可以看到完成这项工作的主要组件。同时,多个节点中每一个节点都拥有一份账本的副本,并可选的拥有一份智能合约的副本,网络中也有一个排序服务。排序服务保证网络中交易的一致性;它也将连接到网络中不同的应用程序的交易以定义好的顺序生成区块。
我们对账本的的第一个更新是创建一辆新车。我们有一个单独的程序叫做 invoke.js ,用来更新账本。和查询一样,使用一个编辑器打开程序定位到我们构建和提交交易到网络的代码段:
await contract.submitTransaction('createCar', 'CAR12', 'Honda', 'Accord', 'Black', 'Tom');
看一下应用程序如何调用智能合约的交易 createCar 来创建一量车主为 Tom 的黑色 Honda Accord 汽车。我们使用 CAR12 作为这里的键,这也说明了我们不必使用连续的键。
保存并运行程序:
node invoke.js
如果执行成功,你将看到类似输出:
Wallet path: ...fabric-samples/fabcar/javascript/wallet
Transaction has been submitted
注意 inovke 程序是怎样使用 submitTransaction API 和区块链网络交互的,而不是 evaluateTransaction 。
await contract.submitTransaction('createCar', 'CAR12', 'Honda', 'Accord', 'Black', 'Tom');
submitTransaction 比 evaluateTransaction 更加复杂。除了跟一个单独的 peer 进行互动外,SDK 会将 submitTransaction 提案发送给在区块链网络中的每个需要的组织的 peer。其中的每个 peer 将会使用这个提案来执行被请求的智能合约,以此来产生一个建议的回复,它会为这个回复签名并将其返回给 SDK。SDK 搜集所有签过名的交易反馈到一个单独的交易中,这个交易会被发送给排序节点。排序节点从每个应用程序那里搜集并将交易排序,然后打包进一个交易的区块中。接下来它会将这些区块分发给网络中的每个 peer,在那里每笔交易会被验证并提交。最后,SDK 会被通知,这允许它能够将控制返回给应用程序。
注解
submitTransaction 也包含一个监听者,它会检查来确保交易被验证并提交到账本中。应用程序应该使用一个提交监听者,或者使用像 submitTransaction 这样的 API 来给你做这件事情。如果不做这个,你的交易就可能没有被成功地排序、验证以及提交到账本。
应用程序中的这些工作由 submitTransaction 完成!应用程序、智能合约、节点和排序服务一起工作来保证网络中账本一致性的程序被称为共识,它的详细解释在这里 section 。
为了查看这个被写入账本的交易,返回到 query.js 并将参数 CAR4 更改为 CAR12 。
就是说,将:
const result = await contract.evaluateTransaction('queryCar', 'CAR4');
改为:
const result = await contract.evaluateTransaction('queryCar', 'CAR12');
再次保存,然后查询:
node query.js
应该返回这些:
Wallet path: ...fabric-samples/fabcar/javascript/wallet
Transaction has been evaluated, result is:
{"color":"Black","docType":"car","make":"Honda","model":"Accord","owner":"Tom"}
恭喜。你创建了一辆汽车并验证了它记录在账本上!
现在我们已经完成了,我们假设 Tom 很大方,想把他的 Honda Accord 送给一个叫 Dave 的人。
为了完成这个,返回到 invoke.js 然后利用输入的参数,将智能合约的交易从 createCar 改为 changeCarOwner :
await contract.submitTransaction('changeCarOwner', 'CAR12', 'Dave');
第一个参数 CAR12 表示将要易主的车。第二个参数 Dave 表示车的新主人。
再次保存并执行程序:
node invoke.js
现在我们来再次查询账本,以确定 Dave 和 CAR12 键已经关联起来了:
node query.js
将返回如下结果:
Wallet path: ...fabric-samples/fabcar/javascript/wallet
Transaction has been evaluated, result is:
{"color":"Black","docType":"car","make":"Honda","model":"Accord","owner":"Dave"}
CAR12 的主人已经从 Tom 变成了 Dave。
Wallet path: …fabric-samples/fabcar/javascript/wallet Transaction has been evaluated, result is: {“color”:”Black”,”docType”:”car”,”make”:”Honda”,”model”:”Accord”,”owner”:”Tom”}
注解
在真实世界中的一个应用程序里,智能合约应该有一些访问控制逻辑。比如,只有某些有权限的用户能够创建新车,并且只有车辆的拥有者才能够将车辆交换给其他人。
清理
When you are finished using the FabCar sample, you can bring down the test network using networkDown.sh script.
./networkDown.sh
This command will bring down the CAs, peers, and ordering node of the network that we created. It will also remove the admin and appUser crypto material stored in the wallet directory. Note that all of the data on the ledger will be lost. If you want to go through the tutorial again, you will start from a clean initial state.
商业票据应用
enrollUser.js
大致步骤:
- 加载网关配置文件
- 获得配置文件中的CA信息
- 获取TLS的CA证书
- 获取组织的ca信息
- new一个钱包
- 查查是不是有这个人了
- 然后新建一个用户
- 并且放到钱包里面
addToWallet.js
这是把已有的用户添加到钱包中,用的是test-network中的User1
issue.js
发行商业票据
- 先获取钱包
- 然后去连接网关
- 然后连接到通道
- 然后链接到智能合约
- 执行issue方法


